RIDING POSITION
The normal riding position whilst travelling down the road should be centre of your lane. This is known as the ‘Command Position’ or ‘Dominant Position’.
The advantages of this position are:
- You get a good view of the road ahead.
- Other vehicles get a good view of you.
- You are dominating your lane, stopping following traffic overtaking until it is safe.
- You will be in the view of the wing and the internal mirrors of the vehicle in front of you.
The riding position is flexible and should be changed if necessary (moving around parked cars, mini speed humps or pot holes etc).
Use this dominant position on the bends – Taking a racing line through the corner could potentially put you in danger if another road user is coming the other way such as a large vehicle swinging out wide to get round the bend, or someone misjudging their speed for the corner.
FOLLOWING DISTANCE
The distance you leave between you and the vehicle in front of you is very important.
Being too close to the vehicle in front could cause the following problems:
- Reduced view of the road ahead.
- Not enough time to react and stop if needed.
- Chance of being hidden to vehicles pulling out of side roads.
In dry conditions, where the road surface is good, you should allow at least a two second gap between you and the vehicle in front. As your speed changes, time stays constant, so the faster you go the bigger the gap becomes. Two seconds works at any speed. The easiest way to check your gap is to find a fixed object (a lamp post etc) and as the rear of the vehicle in front passes that fixed point start counting two seconds (or say “One Mississippi, Two Mississippi” to yourself, as this takes two seconds to say). You should then reach that same fixed object. If you reach it before you finish counting, you are too close and need to back off a little.
In bad weather conditions or on bad road surfaces, you will need to consider increasing the gap to around four seconds.
STOPPING
When stopping your motorcycle you should be using your brakes in the correct order (front and then back brake) and with the correct pressure on each (approximately 70% front 30% rear), in a straight line.
Once stopped you should ideally be in the safety position, which is the left foot on the floor, right foot on the back brake and hands on the handlebars. Make sure you have one of the brakes on at all times when stationary.
Unless you are turning you should stay in your dominant riding position when stopping and if you are at the front of the queue of traffic, you should make sure your front wheel is up to, but not over the white lines.
If you are in traffic, you need to leave a good gap between you and the vehicle in front.
This is for several reasons:
- You can see round the vehicle in front.
- If the vehicle in front breaks down, you are able to get around it safely.
- If the vehicle in front rolls back, it gives the driver time to regain control or you time to take action.
Try not to leave too much of a gap as this could invite the vehicle behind to cut in.
If we have a car in front, it is easy to see round it so we leave at approximately one bike length.
If we have a van/bus/lorry we leave at least two bike lengths so we can see round it and for the driver of that vehicle a chance to see us.
OBSERVATIONS
Observations fall into three types, forward vision, mirror checks and lifesavers.
Forward Vision.
Looking ahead, this is where you’ll be looking most of the time. Scanning near and far, by looking well ahead of the vehicle in front you’ll be able to react to hazards well in advance of when you will need to slow down. Read the road, anticipating what people could be about to do, not just what they should do can make your riding much smoother and safer.
Mirror Checks.
A mirror check is normally checking both mirrors. The big advantage of mirror checks is that you head is still pointing forwards, this means that nothing should take you by surprise. The problem with this type of observation is that there are blind spots that remain unchecked, for this reason if you are planning on changing direction, you should never rely solely on your mirrors.
Mirror checks situations:
- Every 5 – 10 seconds.
- Before accelerating and decelerating.
- When encountering a potential hazard.
- Moving away.
Lifesavers (Blind spot check / Shoulder check).
A lifesaver is a check to the direction you intend to manoeuvre (before you commit yourself to the manoeuvre).
It is a two point check. Firstly, into the mirror and secondly, the blind spot of that mirror (chin to shoulder).
The lifesaver needs to be carried out every time before:
- Turning into a side road.
- Moving away from the kerbside.
- Changing lanes.
- Moving a significant amount in your lane (around parked vehicles or road traffic humps etc).
- Before exiting a roundabout.
RIDING AT THE CORRECT SPEED
Although every road has a speed limit, various things dictate what speed you should be riding at, such as:
- Speed limit of the road
- Weather conditions
- Volume of traffic
- Obstacles (parked cars etc)
- Pedestrians
- Although it is not always safe to ride at the speed limit, where it is safe, you will be expected to ride up to it. It can be just as dangerous riding too slow as it is too fast.
There are a few general rules to remember:
- Where there are lamp posts in a built up area, the limit is normally 30 mph, unless otherwise indicated.
- In 40 mph zones there will normally be repeater signs.
- The national speed limit is 60 mph on single carriageways and 70 mph on dual carriageways for motorcycles.
If you are unsure of the speed limit, try looking down the side roads. If there are 30 mph signs it shows that that road is turning to a 30 mph zone, so the road you are on is more than likely a higher limit, 40 mph for example.
Remember that the change of speed limit sign is often just before the end of the road.
JUNCTION PROCEDURE
The procedure for turning is pretty much the same for all junctions.
We use the O.S.M.P.S.L. procedure:
- Observation
- Signal
- Manoeuvre
- Position
- Speed
- Look/Lifesaver
Once you know where you are turning, you follow the procedure above.
Observations. Check the road ahead to see if there are any junctions before the one you want to take then check your mirrors.
Signal. Let other road users know what you intend to do. If there is a turning before the one that you want, make sure you pass this turning before you signal so as not to mislead any other road users. You should let your indicator flash three or four times before you manoeuvre.
Manoeuvre. Lifesaver in the direction that you are about to move to check that there are no other road users (such as cyclists) in the blind spot, then if safe manoeuvre into position.
Position. If you’re turning left, move about a metre from the kerb (to stop cyclists/motorcyclists undertaking) and if you’re turning right move over to the right far enough over to stop cyclist’s/motorcyclist’s overtaking (but making sure no part of you or your motorcycle is over the centre line). If you’re turning left Major to Minor then normally moving just slightly left of centre is sufficient.
Speed. Once in position you can start to slow down, to prepare for the turn. Slowing down before you are in position could lead to obstructing other road users, so make sure you are in the correct position first. Whilst slowing down, you should also be selecting the correct gear for the turn. If you have to come to a stop, make sure you stop in first gear.
Look/Lifesaver. Lastly, before you turn you should be carrying out a look or lifesaver, depending on the type of turn you are making.
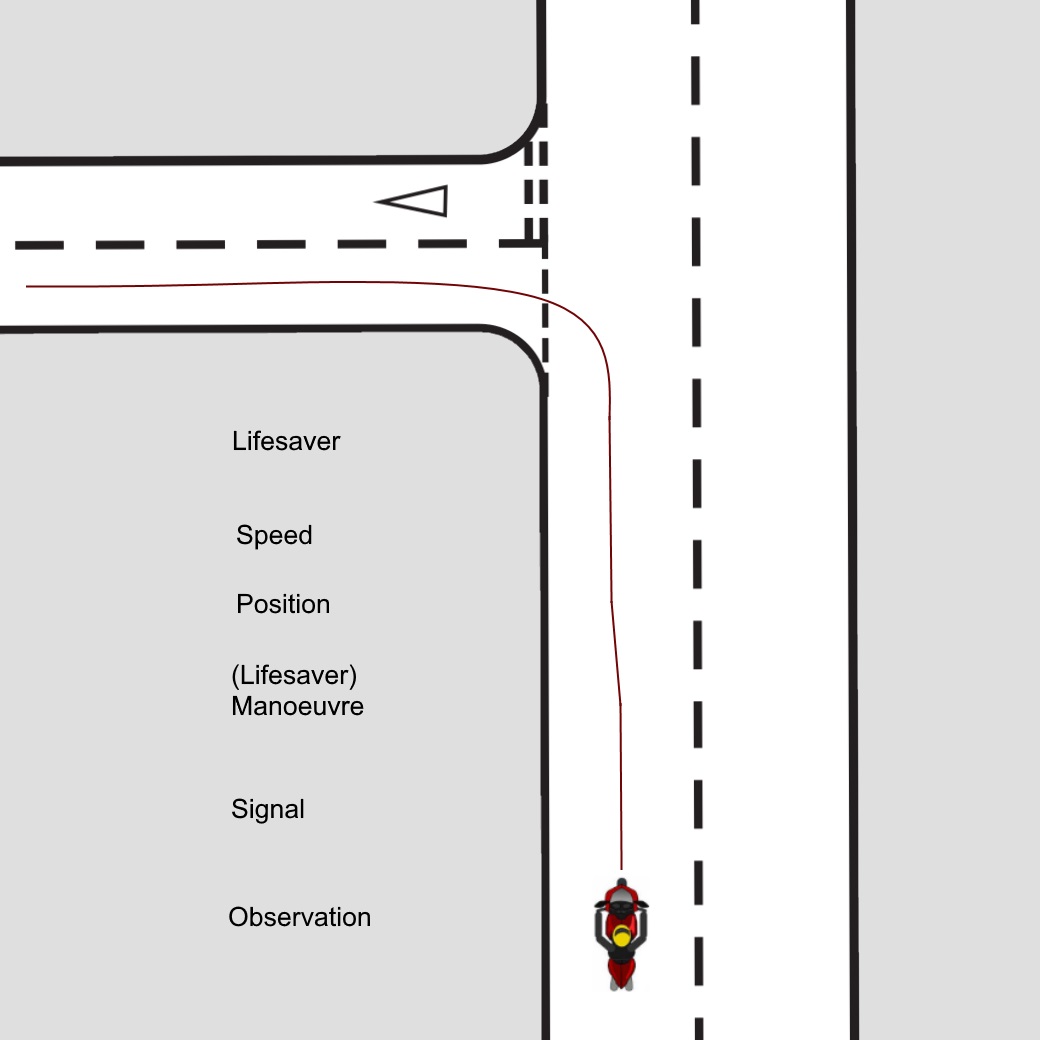
If you are turning from a minor to a major road, your biggest danger is the traffic crossing your path ahead of you. You should therefore be looking right, left, right, and left (minimum) onto that road.
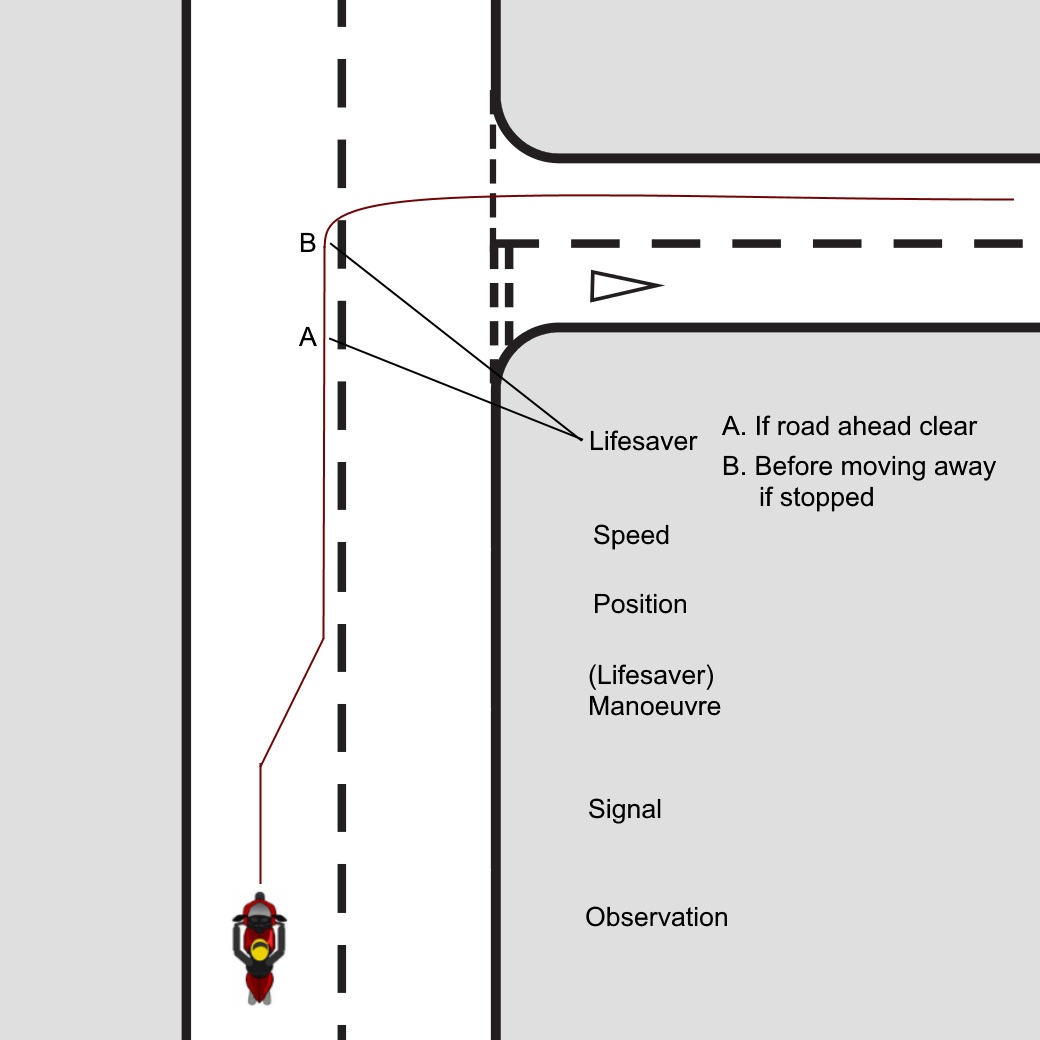
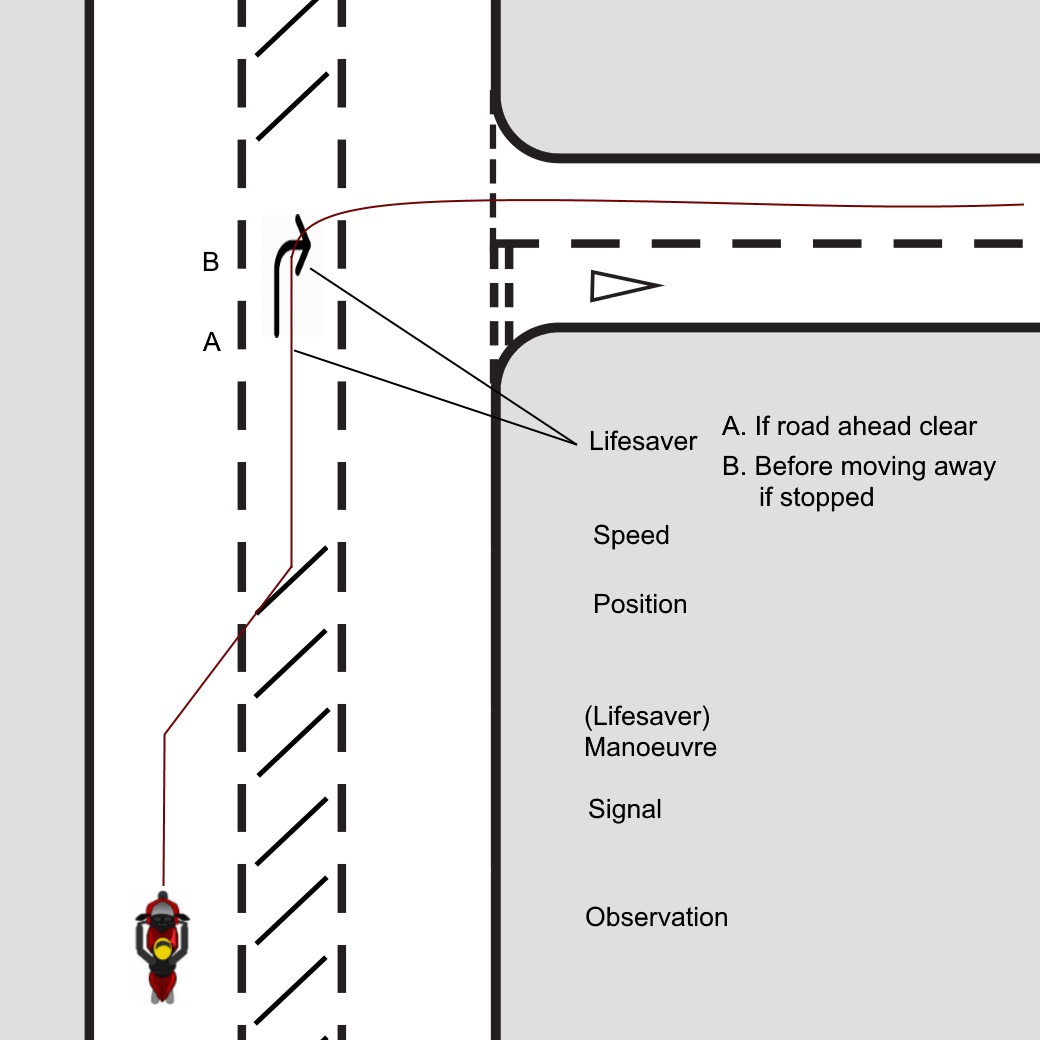
If you are turning from a major road into a minor road you should perform a lifesaver about 10-12 feet from the turn if there is no oncoming traffic and you do not need to stop. If you have to stop due to oncoming traffic perform the lifesaver just before committing yourself to the turn.
Once you have committed to the turn, keep looking at where you want the motorcycle to go.
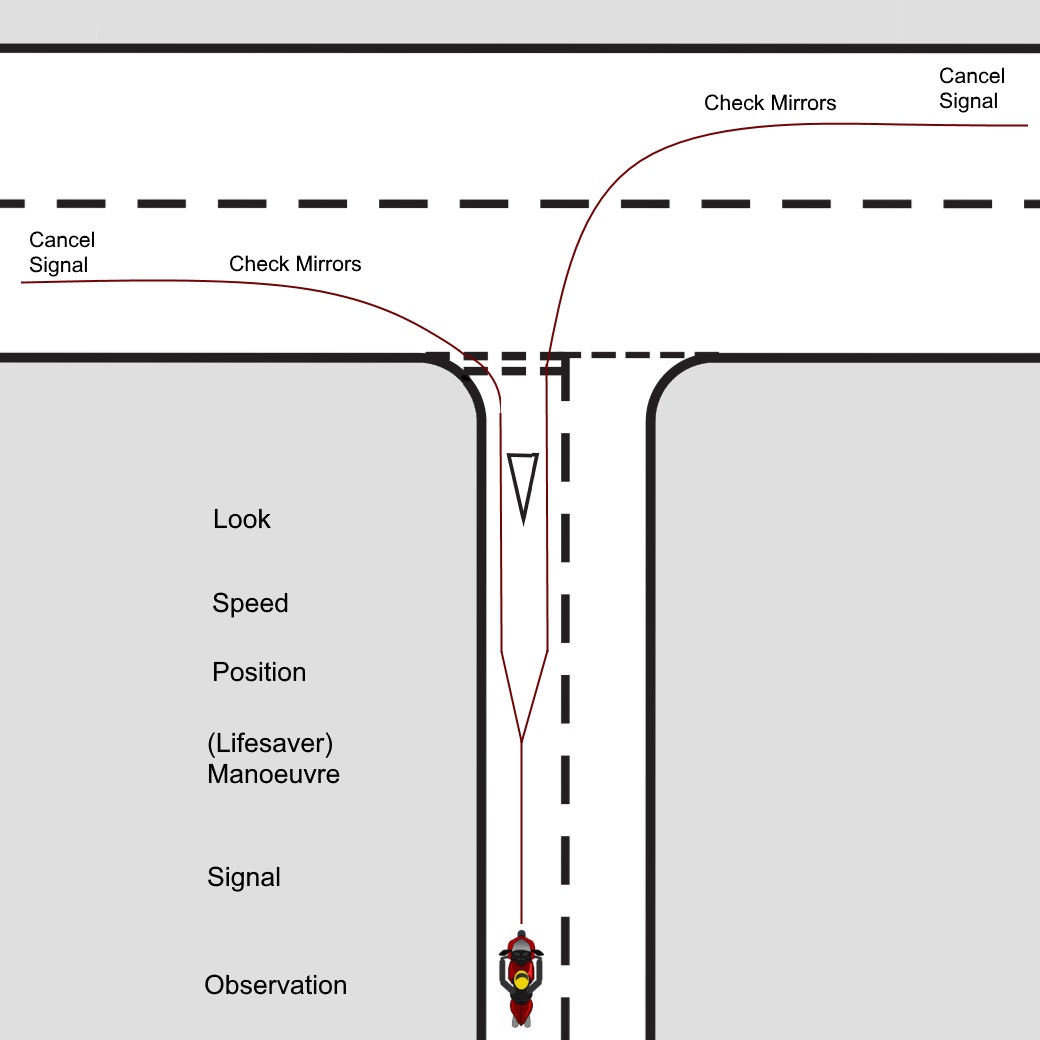
Turning minor to major (from a side road)
Turning left major to minor
Turning right major to minor
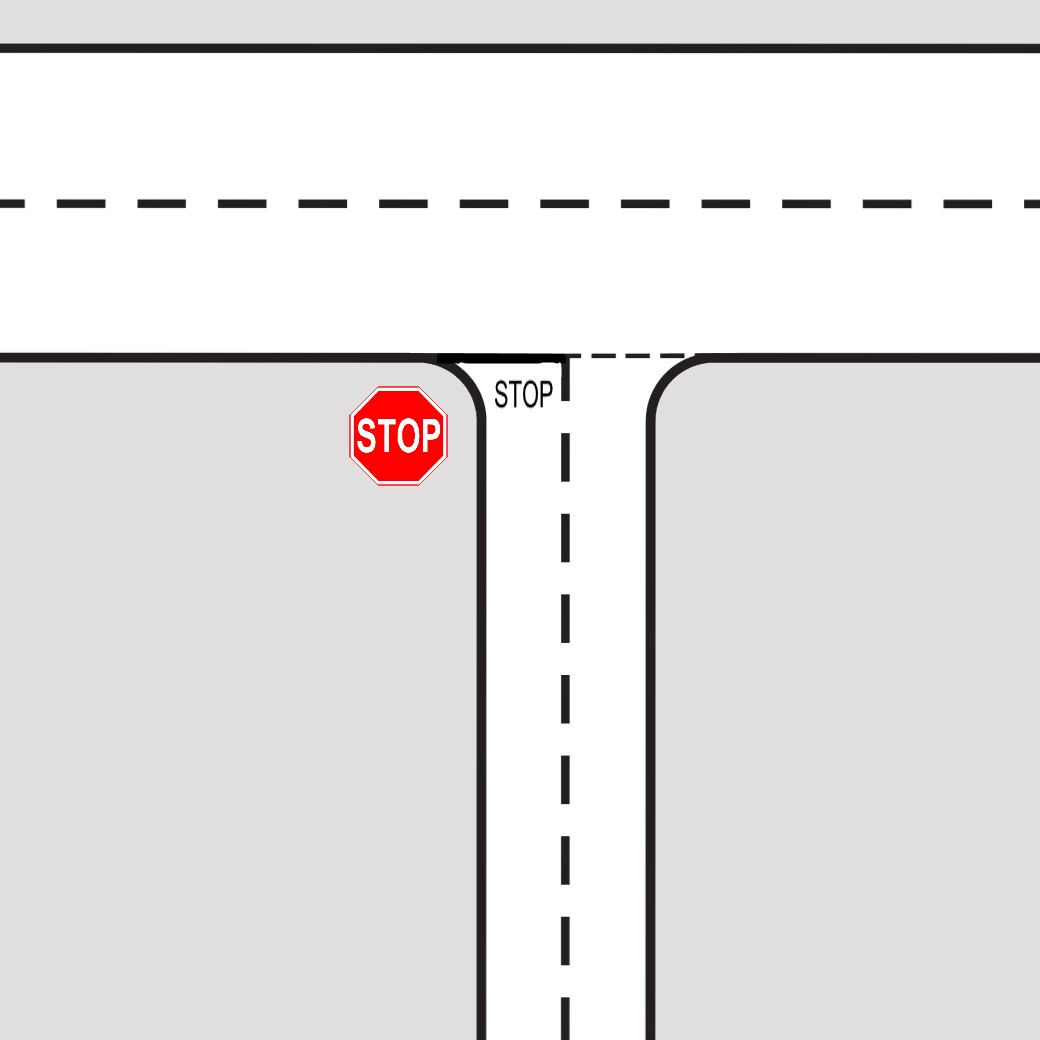
STOP JUNCTIONS
It is a legal requirement that when you reach one of these junctions, you come to a complete stop at the white line. This is a legal requirement.
There are a number of things which may identify this type of junction to you:
- STOP traffic sign
- Solid white line at the end of the road
- STOP written on the road just before the junction
As you pull up to this type of junction, treat it the same as you would any other junction but when you get to the line, stop, put your left foot down and then check the road ahead to see if it is clear. Once you are happy that it is clear proceed as normal.
PROTECTED RIGHT TURN
A protected right turn is where there is a dedicated turning box. The idea is to move into the box to protect yourself from both oncoming and following traffic.
The white lines around the hatching that protect the turning box will often be broken (not solid). If this is the case you may ride through the hatchings if safe to do so and necessary. If the surrounding white line is un-broken (solid), you cannot cross it, and must wait until you get to the turn box.
If there are two protected right turns next to each other (one each way), make sure you only ride in the one you are using. By riding through the other one you could be causing an obstruction to others and potentially putting yourself in danger.
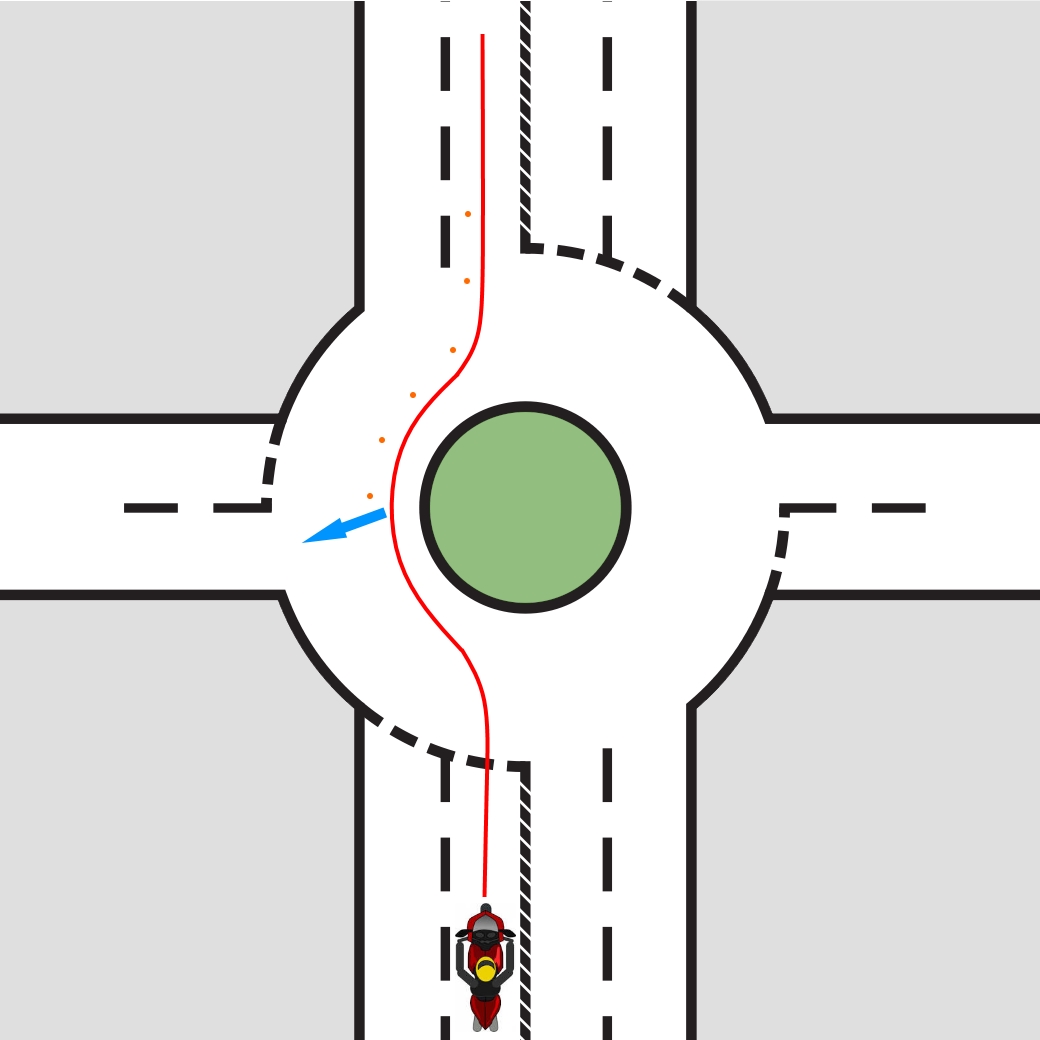
ROUNDABOUTS
We use the same system to tum at a roundabout as we do for turning at junctions (O.S.M.P.S.L). There are a few things that we need to consider when negotiating a roundabout.
Firstly, when entering a roundabout, you normally give way to traffic approaching from the right. Occasionally, traffic on the roundabout has to give way to traffic entering, so look out for Give Way signs or traffic lights which determine priority.
We need to imagine a roundabout as a clock face and we come to the roundabout from 6 o’clock. The first exit is generally described as the left turn. Every exit between the first and 12 o’clock is classed as straight on, and every exit after 12 o’clock is normally classed as a right turn.
Generally, if on approach to a roundabout you have two lanes, the left lane will take you up to and including
12 o’clock, the right lane will take you to each exit after 12 o’clock. There are exceptions to this rule, so you need to look for road markings and traffic signs that tell you which lane to be in (any signs supersede the general rules).


DUAL CARRIAGEWAYS
A dual carriageway is a road which has a central reservation separating the traffic travelling in the opposite direction. Because the traffic is separated, this makes it safer, so dual carriageways usually have higher speed limits.
Entering and exiting a dual carriageway is usually done via acceleration and deceleration lanes commonly known as slip roads.
The idea of a slip road when entering a dual carriageway is to increase your speed, so that as you get to the carriageway you are matching that of the traffic already on the road.
When exiting a dual carriageway, you should try to keep your speed up with the rest of the traffic on the road, until you are on the deceleration lane. By slowing down before getting on to the slip road, you are putting yourself in danger from following traffic.
You should ride to the speed limit of the dual carriageway if it is safe to do so.
This might mean that you will have to overtake any vehicle which is travelling slower than you.
OVERTAKING
There may be times when it is necessary to overtake a vehicle to continue to make good progress. Overtaking will normally take place on dual carriageways (or two lane roads) but is not restricted to this type of road.
If you are choosing to overtake on a single carriageway, much more care is needed and you should never attempt to overtake anyone if you are not 100% happy.
Overtaking is fairly straight forward and is the same as our O.S.M procedure. Mirror, signal, lifesaver and then manoeuvre.
- First, find a safe gap to overtake.
- You should also identify the area you wish to return to your lane
- Check your right hand mirror
- If clear, signal your intention to move out (right hand indicator)
- Before moving out give a right hand lifesaver. At this point you should still have a two second gap between you and the vehicle you wish to overtake
- Move out to an overtaking position, accelerate and cancel your signal
- Move past the vehicle you are overtaking and when you can see the front of the vehicle in your left mirror give a left hand lifesaver and move back to the normal riding position.
Always remember that you can only plan for the distance that you can see to be clear. Do not take chances.
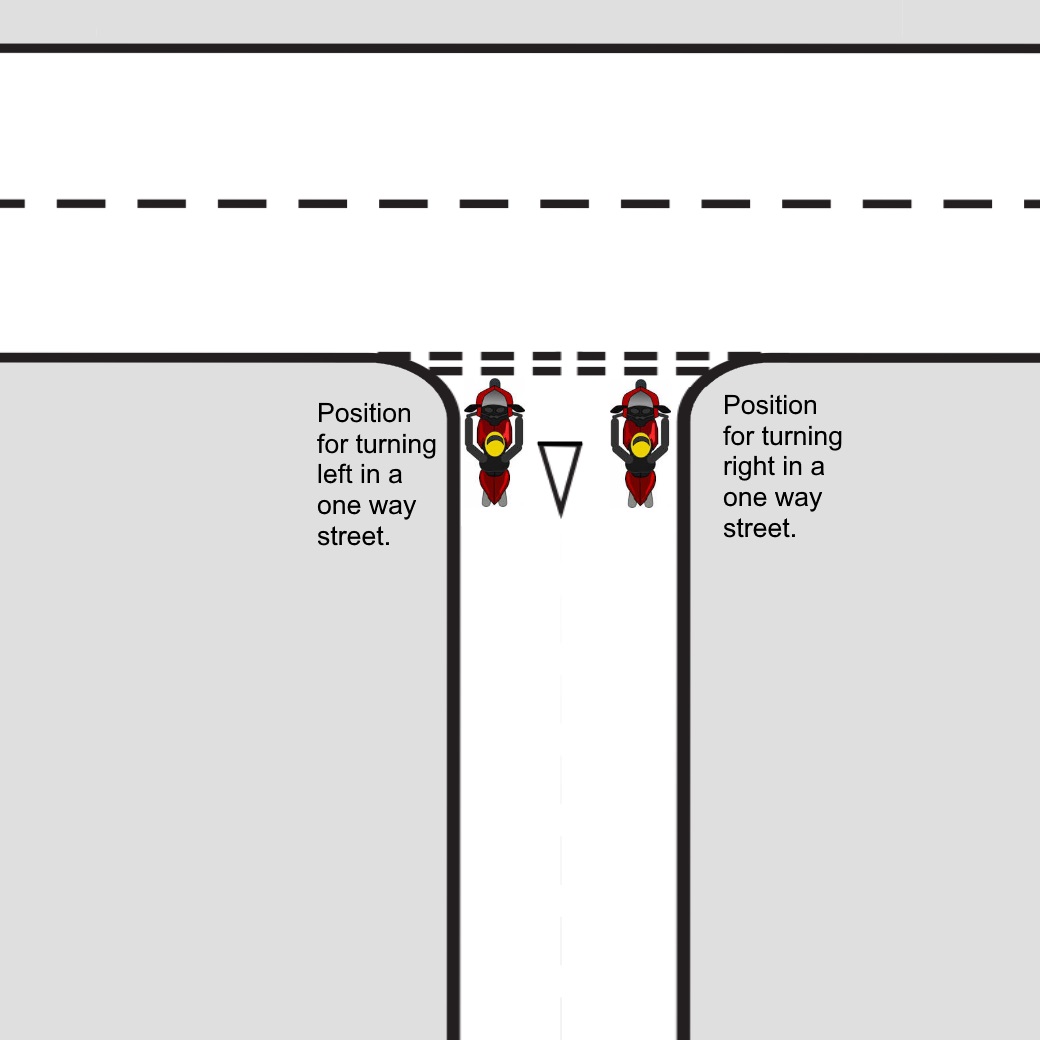
ONE WAY STREET
You must be able to identify one way streets.
Three signs of a one way street are;
- The one-way street sign.
- All parked vehicles are facing the same way, despite which side of the road they are on.
- At the end of the road, the markings will go all the way across the road.
It is important that whenever you turn right from a one way street, to make sure that you are positioned correctly to far over to the left will give other road users a chance to move into the gap to the right and cut you up when turning.
JUNCTIONS WITH NO VERBAL INSTRUCTION
During your test, there may be occasions where you reach the end of the road, or a junction etc. and the examiner has not told you in which direction to turn.
Unless the radio has failed, this will be because there are traffic signs telling you that you can only go a certain way.
As an example, if you approach a mini roundabout with two exits (one to the left and another to the right) and the one to the left has a ‘no entry’ sign, the examiner has no need to tell you where to go, as there is only one direction you can take.
You need to be aware that the examiner is not just looking at your ability to ride the motorcycle but also your ability to read the road and abide by the rules set out in the Highway Code.
HILL STARTS
A hill start is just like pulling away anywhere else, except that you need to take a little more care. When you pull up on a hill, make sure that you are in first gear just before stopping.
Once you have stopped, you should be in the safety position (left foot on the floor, right foot on the foot peg with your toes pushing down on the back brake). This will prevent the motorcycle from rolling backwards.
To achieve a smooth pull away:
- Find the biting point on the clutch
- Set the throttle so that the motorcycle is revving slightly higher than when you normally pull away
- Ease off the back brake
- If you have all the controls set right, at this point the motorcycle should not roll backwards or move forwards.
- Increase the throttle a little whilst easing out the clutch. You will have to be delicate with the controls at this stage.
- When you are moving gently, ease out the clutch the rest of the way whilst increasing the engine revs.
You will need to keep the motorcycle in first gear for a little longer than normal, before changing up to second gear.
CROSSINGS
There are several types of crossings. Regardless of the type of crossing, as you approach, you should have a look in your mirrors. The situation may change and you may have to stop, so by checking your mirrors you will know if there are any vehicles behind you and how close they are.
- Zebra Crossings. As any pedestrians approach the crossing you should prepare to stop. You should not set off again until the crossing is completely clear.
- Pelican Crossings. These are traffic light controlled. And when the lights change from green to amber (amber means stop if safe to do so) you should stop at the white line. After red, the lights will change to flashing amber. If the crossing is completely clear, you may carry on. If it is not clear, wait until it is.
- Toucan, Pegasus & Puffin crossings. These work just like traffic lights. They change to amber and then red. As before, the amber light is a stop light (if safe to do so). After red, the lights will change to red & amber (still a stop light) and then green. Once on green, if the crossing is clear, you can proceed.
- School crossing patrol (Lollypop Lady/Man). These only operate at the start and end (and sometimes at dinner time) of the school day. They will stand on the pavement and when they are ready to stop the traffic, they will raise their lollypop. At this point you must stop. Once the children have crossed the road the lollypop lady/man will return to the pavement, once they have done so, you may proceed.
- Railway Crossings The first thing you should see is a solid amber light (stop light) and may hear a buzzer. After a few seconds, you will see two red lights flashing alternately and the barriers will lower. Once the train has passed, the lights/buzzer will stop and the barriers will raise. Once the barrier is fully up, you can carry on.
BUS LANES
Bus lanes are a common area of confusion and people are often unsure whether they can ride in them or not.
Bus lanes are generally in areas of high traffic flow to try and make public transport more appealing, as the bus will not have to sit in the queue of traffic. For this reason bus lanes are often timed as the traffic flow may only be busy during certain times i.e. going in to town will be busy in the mornings and leaving town will be busy in the evening. Where a bus lane starts there will normally be a sign telling you its hours of operation, if the sign has no times on it, it is in operation 24 hours a day and you are not permitted to use it.
If it does have times, then the times stated are the times of operation and you cannot use it during these times. Outside of these times the bus lane is open to anyone and will generally become the left hand lane, so should be used for normal riding.
It is likely that there will be at least one bus lane on your test route, so it is important that you look out for the signs.